Please contact me if you find any errors or oddities! Or if you need help. I've done my best to write this up as clearly as I can, but you never know.
The shawl is started at the tip and worked row by row from right to left. You can make it with any size squares. Just cast on an odd number of stitches. Swatch and play with different sized squares to see what suits your yarn. Do you want solid squares or striped? Big or small?
The nice thing about working from the tip is that you can check the size as you go and stop when the shawl is just the right size. I blocked my shawl very lightly so it hardly grew at all. If you don't like my special neck, just fill in the space with another triangle.
Try to weave in the ends as you go, either when knitting one of the first rows of a new square or with a needle after knitting a few squares.
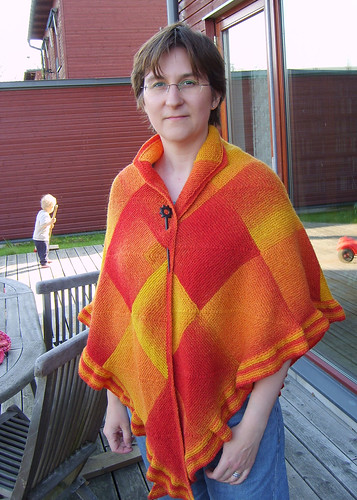
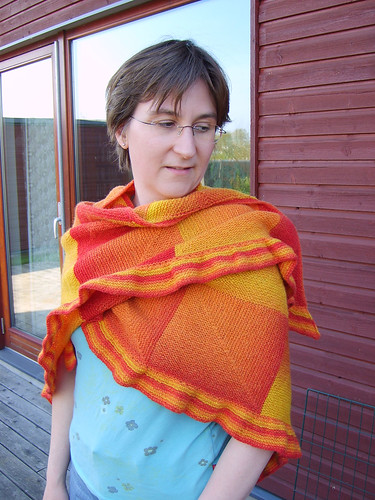
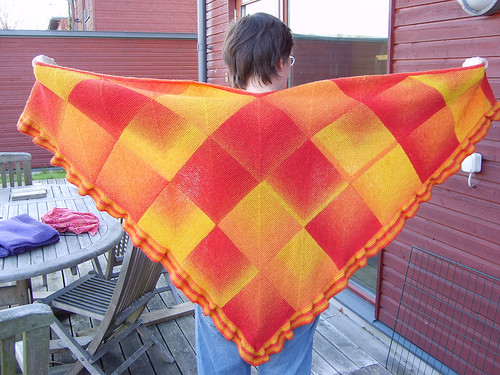
Yarn: Kauni Effekt EU (yellow-orange-red) or another yarn with loooong colour shifts. I used 1570 m (1720 yards), you'll need more if you want a wider and/or rufflier edge than mine.
Needles: 3 mm (or size to get a fabric you like) circular needle
Gauge: 24 stitches/10 cm (4”) The sides of my squares are about 18 cm (7”) long.
Size: about 188 cm (74”) across the top edge and 94 cm (37”) down the back, including the 5 cm (2”) wide ruffle.
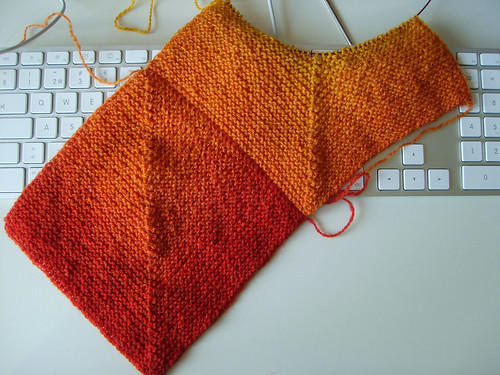
Square 1 (tip)
KCO 81 sts.
Row 1: Knit until 1 stitch remains, p1.
Row 2: Sl 1 kwise, k 38 (until 1 stitch from middle stitch), sl 1 kwise, k2tog, psso, k38, p1.
Row 3 (and all odd rows): Sl 1 kwise, k until 1 stitch remains, p1.
Row 4 (and all even rows): Sl 1 kwise, k until 1 stitch from middle stitch, sl 1 kwise, k2tog, psso,k until 1 stitch remains, p1.
Work until you are about to start a right side row and you have only three stitches on the needle: sl 1 kwise, k2tog, psso. Pull the stitch a little larger, cut yarn and pass the end through the stitch. Do not pull tight. This is the ”waiting stitch”, you will use it later.
Square 2 (right edge)
Right edge square: KCO 40 sts, PU 41 sts from the left edge of square 1, leave the waiting stitch from square 1 alone. 81 sts.
Row 1: Sl 1 kwise, knit until 1 stitch remains, p1.
Proceed from row 2 on square 1.
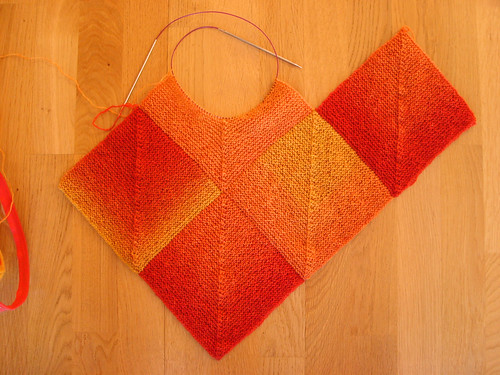
Square 3 (left edge)
PU the waiting stitch from square 1, plus 40 along the right edge of square 1, KCO 40 stitches. 81 sts. Row 1: Knit until 1 stitch remains, p1.
Proceed from row 2 on square 1.
Square 4 (right edge)
As square 2
Square 5 (inside)
PU the waiting stitch from square 2, plus 39 stitches along the left edge of square 2, 1 stitch in the middle of the V between squares 2 and 3 and 40 sts along the right edge of square 3, leave the waiting stitch from square 3 alone. 81 sts.
Row 1: Sl 1 kwise, knit until 1 stitch remains, p1.
Proceed from row 2 on square 1.
Square 6 (left edge)
As square 3

Keep working like this, adding rows of squares until you have 6 rows of squares or the shawl is the size you want it to be.

Top edge Triangles
Knit the triangles just like the squares but add a decrease at the beginning of every row by working an ssk instead of the sl 1. When 4 sts remain: ssk, k2tog, slip first st over the second, cut the yarn and pull out the end.
Leave out the middle triangle for slimmer fit around the neck.

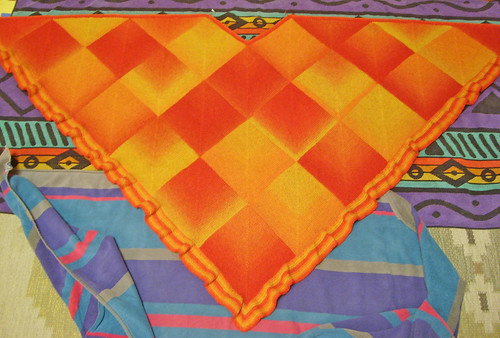
Top border
PU stitches all along the top edge, one stitch in each ssk, from the right side. The exact amount is not important, I didn't count mine, but don't pick up too many, the finished edge should be nice and flat.
Round 1: Sl 1 kwise, knit to end, p 1.
Round 2: Sl 1 kwise, kfb, k to neck edge, kfb, kfb, k to neck center, sl 1 kwise, k2tog, psso, k to neck edge, kfb, kfb, k to end, p1.
Repeat round 1 and 2 for a total of 3 garter ridges. BO loosely. Do not break yarn but go directly to the side border (2 ends less to weave in!)

Side borders
PU stitches along both side edges, including the top border, one stitch for each CO stitch, from the right side. Use a very long circ if available. I used two shorter circs, one for each side. The exact amount of stitches is not important, I didn't count mine (I didn't want to know)
Row 1: Sl 1 kwise, knit to end, p1.
Row 2: Sl 1 kwise, *kfb, k1* to end, p1. I did an extra kfb at the center stitch, but it doesn't really matter. This makes a moderately ruffly edge. If you want a very ruffly edge kfb in ever stitch instead, but you will need lots more yarn.
Row 3: Sl 1 kwise, knit to end, p 1.
Row 4: Sl 1 kwise, kfb, knit to center, kfb, kfb, knit to end, p1.
Repeat row 3 and 4 until it looks right. I did 11 ridges (because I didn't have more yarn) but I think 20 ridges (half the width of a square) would look nice. BO loosely.
Finishing
Weave in all ends and block lightly. I gave my shawl a bath, squeezed out the water and smoothed it out on towels to dry with just a few pins at the top edge.
Abbreviations
KCO: Knitted cast-on. Use it! It makes a good edge for picking up stitches.
sl 1 kwise: Slip 1 stitch knitwise
sl 1 kwise, k2tog, psso: Slip 1 stitch knitwise, knit 2 stitches together, pass the slipped stitch over the new stitch. 2 stitches decreased.
Copyright Malin Nilsson 2009. You may not sell this pattern or any products made from it.