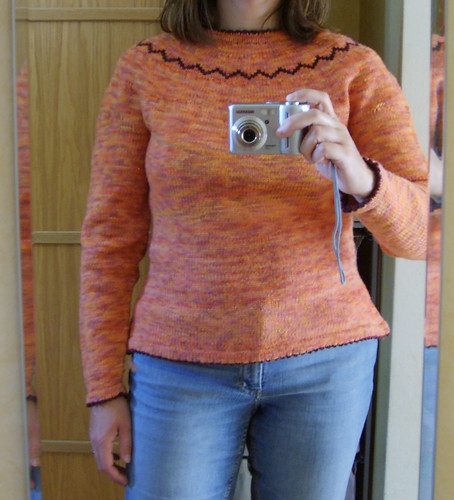
Pattern: A concoction of Elizabeth Zimmermann's Percentage System, the Waist Shape Calculator at Knitting Daily, and the yoke sweater pattern in Ann Budd's Handy Book of Sweater Patterns.
Size: A very customized 42" hip, 33.5" waist and 39" bust, total length is about 23". Overall ease is about 1.5".
Yarn: Dream In Color Classy in Flamingo Pie (about 4.5 skeins) and Gothic Rose (a tiny bit)
Needles: 3.5 mm for inside of the hems and 4 mm for the rest Addi Turbo's of various lengths
I started the body with a picot hem and after about 2" I worked 4 sets of short rows to make the back about 1” longer than the front, with a rounded shape. I had 101 sts across the back at this point.
1st set: Knit until 25 sts remain to the side marker, w&t. Purl back until 25 sts remain to the other side marker, w&t.
2nd set: Knit until 15 sts remain to the side marker, w&t. Purl back until 15 sts remain to the other side marker, w&t.
3rd set: Knit until 5 sts remain to the side marker, w&t. Purl back until 5 sts remain to the other side marker, w&t.
4th set: Knit until 5 sts after the side marker, w&t. Purl back until 5 sts after the other side marker, w&t.
Pick up the wraps and knit them together with the wrapped stitch as you get to them.

The sleeves have picot hems and decreases every 5 rounds up to the elbow, then they are straight.
After I joined the body and sleeves I knit a couple of rounds and then worked three sets of short rows to give a bit more room for the shoulders, like so:
Place markers at sleeve centers.
1st set: Work to shoulder + 12 sts, w&t
2nd set: Work to shoulder + 10 sts, w&t
3rd set: Work to shoulder + 16 sts, w&t
I got the idea for these short rows over at Mim's blog where she explained how she made her beautiful EPS cardigan. I reworked the numbers for my gauge. Mim also helped me (on Ravelry) to understand how to make the short rows at the hem. Thank you so much!
The yoke shaping took some trial and error. At first I followed EZ and Meg Swansen and knit 5" straight before the first decrease round of 25% of the stitches. Second decrease (33%) round was done after 7.5" and after a few more inches I tried the sweater on. Horror! The yoke didn't fit at all, it was loose and baggy and horrible. Apparently I needed to make 4 decrease rounds instead of three, and start them sooner too. I ripped back and did the decreases at 2.25", 4.5", 6.75" and 7.75" instead. This is more like the decreases in The Handy Book Of Sweater Patterns, and Meg Swansen's mods for larger sizes. The important thing here is trying the sweater on and see what works for you.
After the last decrease round I worked short rows again to raise the neck.
1st set: Work to shoulder, w&t
2nd set: Work to shoulder - 5 sts, w&t
3rd set: Work to shoulder - 10 sts, w&t
Then I knit a picot hem at the neck. Oh, and I knit a little zigzag pattern after the second yoke decrease. I just couldn't resist!
Here is the sweater blocking.
 I am very happy with this sweater (and that I managed to finish *two* sweaters in the Loopy DIC KAL!) I have always considered adult sweaters to be slow in the making, but these two were really fast. But my previous sweaters have been mostly colour work things in rather small gauges...
My next sweater will be the February Lady Sweater in red Malabrigo worsted that I snagged at the latest Loopy Ewe sneakup! Actually the same red (Sealing Wax) as in my new shawl project, Whispering Pines in Malabrigo Lace. Pattern by Knitspot. She is by far my favourite lace designer.
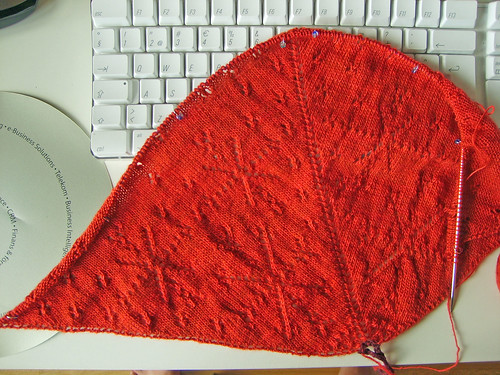 Here it is after charts A and B. the pattern is rather dense here but it gets more lacy soon. And blocking will help.
I actually ordered blocking wires! I'm so excited! I have a finished scarf to try them on the minute they arrive. Or soon after they arrive anyway. It is aroll of wire to be cut in the lengths I want. Suggestions for good lengths would be much appreciated! Ready-made wires seem to be between 12" and 36" inches. I will check more when my wire gets here.
Oh, and here is the machine that has made me into a die-hard coffee drinker!
 It is a Nespresso machine that uses little pre-packed capsules of coffee, one for each cup of espresso (yes, I know, not very environmentally friendly, but great coffee!) There are loads of different varieties of coffee blends to try and it is easy peasy to make just one cup. I always drink mine with lots of milk! Low-lactose milk nowadays, as I have realised that I am lactose intolerant.
No comments:
Post a Comment