Please contact me if you find any errors or oddities! Or if you need help. I've done my best to write this up as clearly as I can, but you never know.
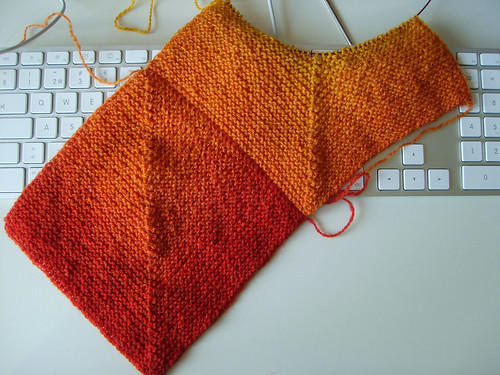
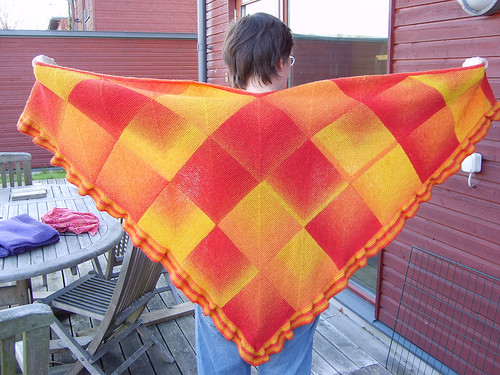
The shawl is started at the tip and worked row by row from right to left. You can make it with any size squares. Just cast on an odd number of stitches. Swatch and play with different sized squares to see what suits your yarn. Do you want solid squares or striped? Big or small?
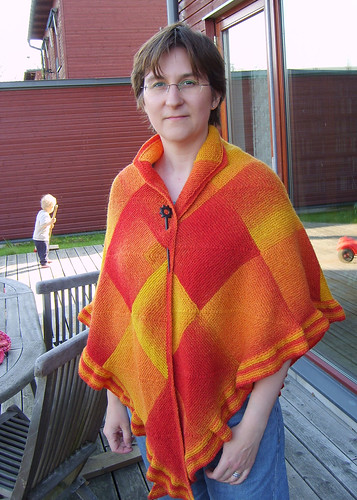
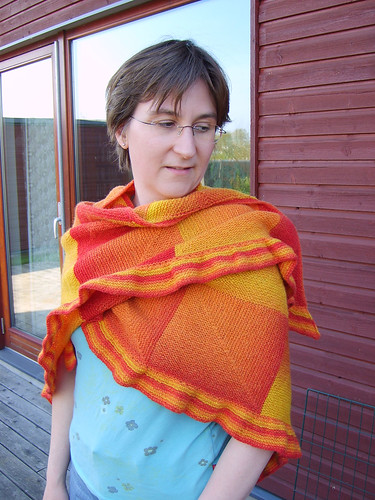
The nice thing about working from the tip is that you can check the size as you go and stop when the shawl is just the right size. I blocked my shawl very lightly so it hardly grew at all. If you don't like my special neck, just fill in the space with another triangle.
Try to weave in the ends as you go, either when knitting one of the first rows of a new square or with a needle after knitting a few squares.
Yarn: Kauni Effekt EU (yellow-orange-red) or another yarn with loooong colour shifts. I used 1570 m (1720 yards), you'll need more if you want a wider and/or rufflier edge than mine.
Needles: 3 mm (or size to get a fabric you like) circular needle
Gauge: 24 stitches/10 cm (4”) The sides of my squares are about 18 cm (7”) long.
Size: about 188 cm (74”) across the top edge and 94 cm (37”) down the back, including the 5 cm (2”) wide ruffle.
Square 1 (tip)
KCO 81 sts.
Row 1: Knit until 1 stitch remains, p1.
Row 2: Sl 1 kwise, k 38 (until 1 stitch from middle stitch), sl 1 kwise, k2tog, psso, k38, p1.
Row 3 (and all odd rows): Sl 1 kwise, k until 1 stitch remains, p1.
Row 4 (and all even rows): Sl 1 kwise, k until 1 stitch from middle stitch, sl 1 kwise, k2tog, psso,k until 1 stitch remains, p1.
Work until you are about to start a right side row and you have only three stitches on the needle: sl 1 kwise, k2tog, psso. Pull the stitch a little larger, cut yarn and pass the end through the stitch. Do not pull tight. This is the ”waiting stitch”, you will use it later.
Square 2 (right edge)
Right edge square: KCO 40 sts, PU 41 sts from the left edge of square 1, leave the waiting stitch from square 1 alone. 81 sts.
Row 1: Sl 1 kwise, knit until 1 stitch remains, p1.
Proceed from row 2 on square 1.
Square 3 (left edge)
PU the waiting stitch from square 1, plus 40 along the right edge of square 1, KCO 40 stitches. 81 sts. Row 1: Knit until 1 stitch remains, p1.
Proceed from row 2 on square 1.
Square 4 (right edge)
As square 2
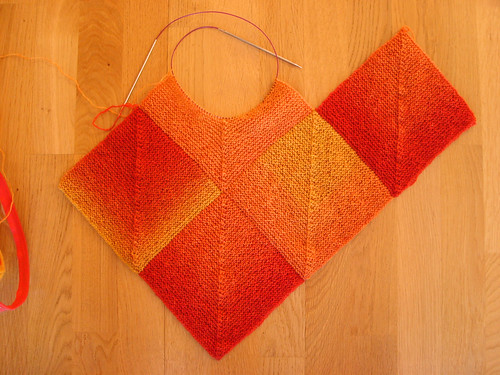
Square 5 (inside)
PU the waiting stitch from square 2, plus 39 stitches along the left edge of square 2, 1 stitch in the middle of the V between squares 2 and 3 and 40 sts along the right edge of square 3, leave the waiting stitch from square 3 alone. 81 sts.
Row 1: Sl 1 kwise, knit until 1 stitch remains, p1.
Proceed from row 2 on square 1.
Square 6 (left edge)
As square 3

Keep working like this, adding rows of squares until you have 6 rows of squares or the shawl is the size you want it to be.

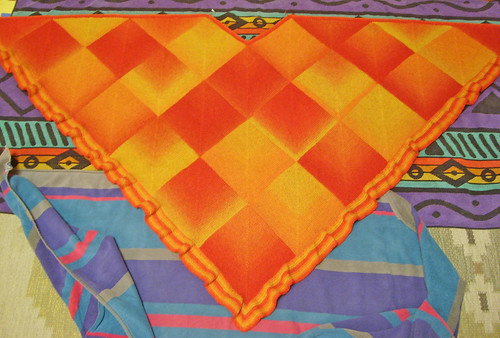
Top edge Triangles
Knit the triangles just like the squares but add a decrease at the beginning of every row by working an ssk instead of the sl 1. When 4 sts remain: ssk, k2tog, slip first st over the second, cut the yarn and pull out the end.
Leave out the middle triangle for slimmer fit around the neck.

Top border
PU stitches all along the top edge, one stitch in each ssk, from the right side. The exact amount is not important, I didn't count mine, but don't pick up too many, the finished edge should be nice and flat.
Round 1: Sl 1 kwise, knit to end, p 1.
Round 2: Sl 1 kwise, kfb, k to neck edge, kfb, kfb, k to neck center, sl 1 kwise, k2tog, psso, k to neck edge, kfb, kfb, k to end, p1.
Repeat round 1 and 2 for a total of 3 garter ridges. BO loosely. Do not break yarn but go directly to the side border (2 ends less to weave in!)

Side borders
PU stitches along both side edges, including the top border, one stitch for each CO stitch, from the right side. Use a very long circ if available. I used two shorter circs, one for each side. The exact amount of stitches is not important, I didn't count mine (I didn't want to know)
Row 1: Sl 1 kwise, knit to end, p1.
Row 2: Sl 1 kwise, *kfb, k1* to end, p1. I did an extra kfb at the center stitch, but it doesn't really matter. This makes a moderately ruffly edge. If you want a very ruffly edge kfb in ever stitch instead, but you will need lots more yarn.
Row 3: Sl 1 kwise, knit to end, p 1.
Row 4: Sl 1 kwise, kfb, knit to center, kfb, kfb, knit to end, p1.
Repeat row 3 and 4 until it looks right. I did 11 ridges (because I didn't have more yarn) but I think 20 ridges (half the width of a square) would look nice. BO loosely.
Finishing
Weave in all ends and block lightly. I gave my shawl a bath, squeezed out the water and smoothed it out on towels to dry with just a few pins at the top edge.
Abbreviations
KCO: Knitted cast-on. Use it! It makes a good edge for picking up stitches.
sl 1 kwise: Slip 1 stitch knitwise
sl 1 kwise, k2tog, psso: Slip 1 stitch knitwise, knit 2 stitches together, pass the slipped stitch over the new stitch. 2 stitches decreased.
Copyright Malin Nilsson 2009. You may not sell this pattern or any products made from it.
Great shawl and I have the exact Kauni yarn in your colors. I do love mindless knitting likke this.
ReplyDeleteGood that you wrote up a pattern for the shawl that imitates mine, so I don't have to. The way I've learned domino knitting though is that the waiting stitch is used as the center stitch of the next (inset) square, not at the beginning of the row.
ReplyDeleteThe way you pick up stitches is remarkable!!
ReplyDeleteThanks Ruth! Do tell me if you make one, I'd love to see other versions of the shawl.
ReplyDeleteSabine, I'm so sorry I didn't credit you for the idea! I have added it now. It was on my Ravelry project page all along but I forgot to copy it here. My sincere aplologies.
ReplyDeleteThis is what I learned to do with the waiting stitch but your way sounds reallly good. I have to try it!
Anonymous: It's just the Domino technique, no invention of mine. You may want to take a look at Vivian Høxbro's book Domino Knitting.
ReplyDeleteWow, I love this! Thanks for sharing your shawl.
ReplyDeleteThank you, Aija!
ReplyDeleteFantastiskt! Den är hur snygg som helst, och speciellt i det där garnet!
ReplyDeleteTack för att du delar med dig av mönstret!
So beautiful!
ReplyDeleteThe colours
ReplyDeleteis more beautiful than sunshine...I really want to try the pattern!
This is gorgeous. Thanks so much for sharing! Definitely going on my to-be-knit list.
ReplyDeletelike a beautiful sunset
ReplyDeleteVery pretty and interesting. I am not realy into shawls but this one facinates me.
ReplyDeleteThanks for sharing. I love the collar.
SEA
Thank you so much everyone for your kind comments :-)
ReplyDeleteBeautiful! You are very talented! I see you use a circular needles for everything - I really should make an effort to become more comfortable with them.
ReplyDeleteThank you Bridget!
ReplyDeleteI sure use circs for everything, even working back and forth. It puts less strain on your body, as the project lies nicely in your lap instead of flapping about at the ends of straight needles. I don't poke anyone when I knit on the bus. Sweaters knit in the round has a lot less sseaming! And with Magic Loop I don't need a lot of different lengths either, I can use the same length for the body and the sleeves of a sweater.
Try using circs on something small and easy, a hat (or my baby mittens :-o)
Hi Malin! Thanks for your responses to my comments. I'm busy doing the mittens on straight needles, but didn't add any extra stitches because I've only just seen your suggestion. I homeschool my 3 boys and when I need a breather, I escape to my PC! I'm realizing that my knitting skills are very limited - I have difficulty with seaming, so using circular needles would eliminate that tedious task after all the pieces are made. I'm looking forward to my mother's visit from South Africa next month, so she can give me some guidance. For example, I knitted a baby jersey - my mom said I should knit the bands onto the fronts at the same time, but I couldn't figure it out, so I picked up the stitches and knitted the bands afterwards...
ReplyDeleteI tried the mittens on a circular needles, but couldn't figure out how to join such a tiny round... I'll have to make a hat to get some practice! Have a great evening. I'm in Maryland, USA, so I still have to chase my boys to finish their lessons this afternoon and will knit while I supervise.
Bridget, I wish I could show you how, but maybe one of these videos will help you: http://www.knittinghelp.com/videos/advanced-techniques/
ReplyDeleteI mostly knit magic loop when doing smaller things in the round, but I learned on dpn's. IMO magic loop is easier, less needles to keep track of, and they usually stay put in the knitting and don't fall to the floor... Good luck!
så fin den är!
ReplyDeleteTack :-)
ReplyDeleteLove the colors! Thanks so much for showing it to us!
ReplyDeleteThanks Malin! This link showed magic loop technique http://www.youtube.com/watch?v=BtBSmxGomPk and now I understand. I finished the mittens today - very cute - I also used a variegated yarn. Next time I will try them on the circular needle. Now I need to find a baby hat pattern to go with the jersey, bootees & mittens. Thanks for your help!
ReplyDeleteUrtjusig! Och så jämnt och snyggt du stickar - helt fantastiskt.
ReplyDeleteThis comment has been removed by a blog administrator.
ReplyDeleteThis comment has been removed by a blog administrator.
ReplyDeleteThis comment has been removed by a blog administrator.
ReplyDelete